|
The following instructions refer to a mailbox called user, under a domain called domain.co.il. replace these details with your domain and mailbox. important: if this is the first time you run Outlook, start directly from step 3. |
הוראות אלו מתייחסות להגדרת תיבה דוא"ל בשם user תחת דומיין בשם domain.co.il. כמובן, יש להחליף את הנתונים האלו בשם התיבה והדומיין הרצויים. שימו לב: אם זו הפעם הראשונה שאאוטלוק הופעל, יש להתחיל ישירות משלב 3. |
|
Under Tools menu, go to Accounts |
תחת תפריט כלים, פתחו את חשבונות |
1 |

|
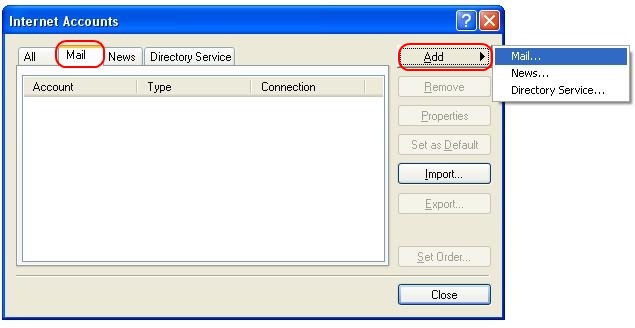
If you choose to you can see all mail accounts currently configured under Mail tab. to add a new mail account click on Add -> Mail. |
אם תרצו, בלשונית דואר תוכלו לראות את כל החשבונות שמוגדרים כרגע. ע"מ להוסיף חשבון דואר, לחצו על הוספה -> דואר. |
2 |
|
Type your name or your company's name. what you type here is what people will see when you send them mail. |
כתבו את שמכם או את שם החברה. מה שרשום כאן הוא מה שאנשים שיקבלו מכם דואר יראו. |
3 |

|
Type your full email address. |
הקלידו את כתובת הדואר המלאה. |
4 |

|
The incoming mail server is a POP3 server. both incoming and outgoing mail servers addresses are mail.domain.co.il |
שרת הדואר הנכנס הוא מסוג POP3. כתובות שרתי הדואר הנכנס והיוצא הן mail.domain.co.il. |
5 |

|
In the account name type the whole email address. in the password field type the password as defined in control panel. |
בשם החשבון הקישו את כתובת הדואר המלאה. בשדה הססמא הקישו את הססמא כפי שהוגדרה בפתיחת התיבה בממשק הניהול. |
6 |

|
Click Next and Finish. |
הקישו הבא וסיום |
7 |

|
In the Accounts window you can now see the new mail account. mark the account and click on Properties or double click on the account to access further settings. |
כעת בחלון החשבונות ניתן לראות את החשבון החדש. סמנו את החשבון ולחצו על מאפיינים או לחצו פעמיים על החשבון, על מנת להכנס להגדרות נוספות. |
8 |

|
Go to Servers tab. at the botton of the window you'll see "Outgoing Mail Server". check the box next to "My server requires authentication" |
עברו ללשונית שרתים. כעת בתחתית החלון תופיע קטגוריה בשם "שרת דואר יוצא" סמנו את התיבה ליד "שרת שלי מחייב אימות" |
9 |

|
Click OK and Close. your email account is now configured and ready to use. |
לחצו על אישור וסגור. כעת חשבון הדואר שלכם מוגדר ומוכן לשימוש. |
10 |